Tuesday, 15 December 2015

Doiley Banner - Couture Creations


#couturecreationsaus

Thanks for visiting the Couture Creations blog today! 
Tracey R with you to share a name banner I made for my daughter. 

As soon as I saw the new Perfectly Petite Doilies range, 
I imagined them strung up with ribbons, and hanging on the wall.
I love tiny doilies on anything! And by using them for more than your cards or 
scrapbook layouts, you are getting even better value for your crafting dollar. 
This range is so versatile and petite, I can't wait to share them with you! 

So let's get crafting!
This name banner was a surprise for my daughter in her favourite colour green, but of course you can choose any colour you like.  They'd look gorgeous in the purple tones of our Hearts Ease Collection.

This project used the Dandie Floral die for the green letters in the middle and the 
Lotus Daily die for the white doilies either side of the name.  
Be sure to check out the entire range of Perfectly Petite Doilies here.
There are 12 in the set and they are just so pretty you'll want them all!

I cut the doilies from Core'dinations Cardstock and because I used the Quick Release Die Paper, they came  out beautifully after one pass.  No picking out the little bits! 
You'll need enough Dandie Floral Die cuts to spell your chose name or word, plus two for the ends, and 4 of the Lotus Daily dies.  I had two left over Dandie Floral dies from another project so I used them on the on either end. They were also inked with bronze so give a nice contrast.
I stamped the letters straight onto the Dandie Floral die cuts
And threaded all the doilies onto white and gold twine. 
I've punched some little circles from a piece of Vintage Rose paper and will placed two circles secured with a Mini Glue Spot between each doily.  This will keep them in place, but still allow for a little but of movement. 
Using the  LED Precision Tweezers & Mini Glue spots (I simply can't do without these!) 
I've adhered the two circles together catching the twine in the middle.  
Time for some flowers! 
I've coloured my white flowers (these ones are the new Tied Dyed & Jewelled Florettes) with green spritz to match my cardstock.  The Non-Stick Craft mat is the perfect place to do it! 
Not only does it clean up easily when you're done but you can also use the extra spritz!
I've simply put some white card stock on top of the left over spray and TA-DA! 
I just made my own coloured paper.  Perfect for another project - be it a card or on a scrapbook layout. You could even use it to die cut out! And you'll never get the same pattern twice. So you'll always have a one-of-a-kind background and even more exciting - that you made yourself.
 I've used Crystal Gemstones & Green Envy 2mm Gemstones to bling up my banner, before adding my flowers with Mini Glue Spots
The final touch is to raid your ribbon stash for coordinating colours and tie lengths at either end.
I just used a single knot, and love the shaggy look it gives. 
I've then added the final two doilies at each end to secure the twine. 
You could make this for any occasion - Christmas, Birthday, Christening, Wedding, New Baby etc
The possibilities are endless!


Be sure to check the Couture Creations Blog to be inspired 
by the amazing ladies on the Design Team. 
You can also follow Couture Creations on


FacebookPinterestInstagram and Twitter. 


Couture Creations Products Used


Have a crafty day! 
Tracey R
xx


Friday, 20 November 2015

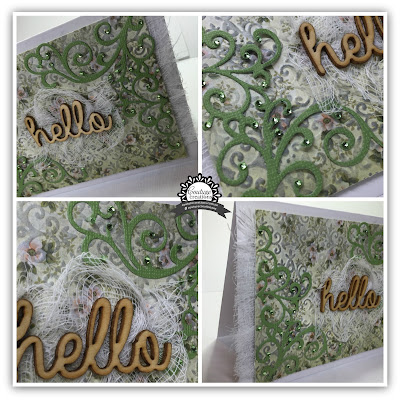
Hello Card - Couture Creations


#couturecreationsaus

Welcome to another day of Couture Creations inspirations!
Tracey R with you today - nice to see you.

When you haven't used product in your stash for a while it's like rediscovering them all over again!
That was me with today's project - a card using the beautiful Vintage Rose Collection.
I 've been using Hearts Ease so much that my lovely Vintage Rose and been delegated to the bottom of my paper stack...but not today!

So let's get crafting with an old favourite!
I especially loved the greens in the Vintage Rose Collection, and this paper (Blooms in Green) was one of my favourites.  Obviously because I had been hoarding it for that "special project!" 
Time to use this beauty and make a card for a special friend. 

I've cut a piece of  the Vintage Rose paper and run it through my Big Shot with this lovely embossing folder from the Hearts Ease Collection
To really bring out the embossed pattern I've lightly dabbed a small ink pad over the paper, 
so it just picks up the raised contours. 
Cutting the embossed patted down  to the size of my card front, I've added some gauze on either end as a trim (using double sided tape) and have then mounted the paper on foam tape for dimension and adhered to the card.  It add some detail to the card I've cut two of the single flourish from the Coteaux Curls (2pc) set from the Elegant Card Cuts Collection, placing them in opposite corners. 
Given the intricacy of this die the Turbo Precision pen was perfect to use when adhering them. 

 Once dried, I've added 2mm gemstones in Celadon and placed on the ends of the curls.
To add my title I've used a chipboard word, with some gauze underneath.  I used the Turbo Precision pen again to stick both word and the gauze to the paper.
And we're done!  
Nice and quick for when you need a card in a hurry, but certainly not scrimped on colour  or details.
Thanks for dropping by. 

Be sure to check the Couture Creations Blog to be inspired 
by the amazing ladies on the Design Team. 
You can also follow Couture Creations on
FacebookPinterestInstagram and Twitter.


Couture Creations Products Used


Monday, 9 November 2015

Congratulations Card - Couture Creations


#couturecreationsaus

And hello again to you crafty friends!
Tracey R here with another project share. 

I am loving using white in my projects at the moment. 
It's clean & minimalist look gives a classic feel to any project.

So without further ado, here's my classic white 'Congratulations' card 
using some gorgeous Couture Creations products.

Let's get creating!

I've started by cutting a rectangle of Hearts Ease Patterned paper that just fit the for my card. 
I've then cut 2 Nostalgic Narelle dies form the Amaryllis Ornamental Lace Die Collection in Ultimate Crafts White Cardstock. 


Such a pretty and versatile die, I used this one several times and can see it 
being used many times more.  And to get even more out of your dies don't forget that you can deconstruct them and cut them up...cut the flourishes out and use them 
separately on your project.... that sounds like a future project! 
And when using any of our dies don't forget the Quick Release Die Paper
Next I've inked around the edges of the Hearts Ease Paper and adhered to the front of my card with 6mm double sided tape.  I love the contrast of this paper within the Hearts Ease collection which is predominately rich purples, so to have some muted tones makes it even more versatile. 


Next step is to place the two Nostalgic Narelle dies on top of the patterned paper.  On my card they slightly overlap in the middle (which won't be seen anyways) and have trimmed off the excess from the edges. Given the intricate cut of this die, the Turbo Precision Glue Pen is perfect as it comes out very fine and sticks fabulously. 


To make some leaves for my flower I've cut one Large Winter Tree (Secret Garden Intricate Dies) also in Ulimtate Crafts White Cardstock.  It has such pretty foliage I'm going to just snip off the branches from the trunk and voila! Instant 'leaves' for my flowers.\

 I've added 6mm doubled sided tape to the back of a Beaded Satin Bloom and placed the branches top and bottom of the flower.  To give the flower more dimension and contrast I've added a piece of gauze   onto the back of the flower. 

I've added my flower embellishment to middle of my card using a 3D glue spot.
(These dots are fantastic for adding dimension, and boy do they have stick)
and finally added a small greeting to the top right of the card. 
And we're done!
Here's a few close ups


Thanks for dropping by. 

Be sure to check the Couture Creations Blog to be inspired 
by the amazing ladies on the Design Team. 
You can also follow Couture Creations on
FacebookPinterestInstagram and Twitter.


Couture Creations Products Used


Monday, 12 October 2015

So Succulent with Couture Creations


#couturecreationsaus

Hi and welcome to Couture Creations today. 
Thanks for joining us. 

I just love weddings, especially love all the little details.
I was so excited to attend a gorgeous "pop up paddock" wedding earlier this year for
a wonderful couple.  There was a strong sense of vintage throughout the day,
but the hero and show stoppers of the day was the succulents. Hundreds of them!
The bride had lovingly potted and nurtured these little plants to decorate the ceremony and reception.
But the ones that stood out the most for me, were the ones on top of the cake
(Can i just say - that she made! She's a true amazing woman. Big shout out to you Rach!!)

Looking through the photos again, the deep purples and greens reminded me
of our beautiful Hearts Ease collection and was the inspiration for my layout today. 

So let's get crafting!


I started by selecting my papers from the Hearts Ease Collection
It matched so perfectly it was hard to narrow it down!

I decided on the purple diamond pattern, a two tone stripe and a green for contrast and to bring out those gorgeous greens in the succulents. 

I matted the main photo on several layers of the patterned Hearts Ease papers
and also added some vellum to break up the colours. 


To create my background, I've stencilled modelling paste on to a piece of Core'dinations White cardstock, and dried with dried with the Couture Creations Heat tool.  Love this!
When it was all dry I've added gold spritz on top using some plastic packaging (waste not want not!). 


To add some extra sparkle to the layout and to finish off the background, I've applied Aztec Gold Glitzin' Glamour over the modelling paste and gold spritz. 


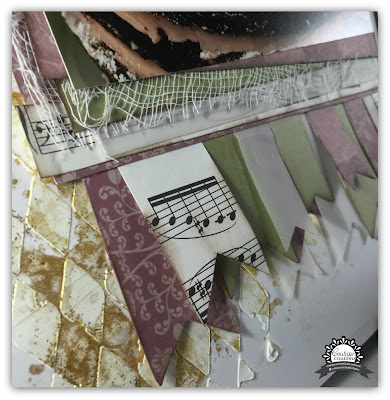
I've added added a strip of music paper behind both photos. and placed them on the layout 


I wanted to add another pop of green near the photo, so I added a small strip under the main mat.
To embellish the bottom of my page, I've made banners in various sizes from the same papers used matting my photoes.  

Under the smaller photo of the cake I've placed three of the new Couture Creations white flowers with Aztec Gold Glitzin' Glamour on top of some gauze. I used one full English Rose (3.5cm) on the left hand side, but as i wanted smaller flowers I've used the middle of the Camden Cottage Roses for this project (they rip apart easily) and will used the outer petals on another project.  
To add some dimension to the flowers, I used 3D Glue Spots to adhere them to the page. 


I've cut three of the new Tall Flourish die from the new Secret Garden Collection,
and placed one above the photo and 2 tucked under the flowers.
A die like this is when your Quick Release Paper really comes into its own!!
Cutting these fine lines is so easy and the cuts are so intricate and delicate.
I have to say it's becoming one of my favourites.

After adding the flowers and gauze to the lower left of the layout, I wanted more gauze and tucked in some around the main photo to add some interest and soften the lines.
Final touch was to add the title with letter stickers.


And we're done! 


Thanks for dropping by. 

Be sure to check the Couture Creations Blog to be inspired 
by the amazing ladies on the Design Team. 
You can also follow Couture Creations on

FacebookPinterestInstagram and Twitter. 


Couture Creations Products Used


\

Have a crafty day! 
Tracey R
xx