Showing posts with label gold. Show all posts

Thursday, 28 January 2016

Flower Girl - Couture Creations


And hello there crafty friends! 
Nice of you to pop by and visit us here on the Couture Creations blog. 

Are you as excited as I am by all the recent CHA updates and releases? 
My golly GOSH!  It sends crafters (me included) into a frenzy! I can't wait to get the new products and start creating with them.  If you did miss out on any of our exciting updates, have a look 
through our CHA 2016 sneak peak posts and see all the amazing new 
releases coming very soon to a store near you.  

One of my most favourite things about crafting is that there is no right or wrong.  
There really isn't a "Craft Rule Book" that you need to follow.  Pretty much anything goes!
And I love being able to use things in ways they weren't necessarily designed for. 
 Every time I use my Quick Release Die Paper I admire how pretty it is, and how the pattern would look lovely on the background of a layout. 

So that's exactly what I've used as my background "patterned paper" & teamed it with darling little doilies from the Perfectly Petite Doilies Die Collection
And I just love how it's turned out! 
I probably mention most posts just how AMAZING this paper is.  
It's without a doubt a game changer. And here is another use! 
I've cut a length of Quick Die Release Paper longer than my white 12x12 Ultimate Crafts white card stock. Approx. 16inches long.  I've then pleated the end of the paper, and cropped off any excess. 
The only thing with using the Quick Release Die Paper like this, is that it's meant to be 'non-stick', so doubled sided tape isn't going to hold it.  I've used the 15mm Jumbo Tip 2 Way glue stick around the edges and also attached some mini staples.  
I've mounted my photo on layers of cardstock and vellum and then a final layer of Quick Release Die Paper. So that it sticks to the white cardstock background, and I've stapled a small square of off cut cardstock to the photo mats and mounted on foam tape
Using a piece of 18mm doubled sided tape I've pleated some gold tissue paper from under the photo to the edge of the page.  I had some white card stock form another project that had been sprinted with gold, so have cut 18 doilies (using your Quick Release Paper!) and adhered them to the right hand side of the layout, in the pleats and around the photo.  The majority were adhered with doubled sided tape, and a few with 3D Mini Foam Dots to add some depth & dimension.          
                      
Who doesn't love a doiley? There are 12 gorgeous designs in Perfectly Petite Doilies range - it's so hard to choose which ones to use! I've chose 4 that complimented each other, but were still different. 
I've printed my journalling, cut into strips and placed on the layout with 6mm double sided tape.  With the accent strip, I've mounted the words on 3D Foam Strips, on top the gold tissue paper which had 6mm double sided tape on the back.  I've added my favourite 2mm Crystal Gemstones on either side of the word strips, 3 to the top of my photo, and to a few of the side doilies.
All that's left is to add a title, and you're done. 

So I'm here today to remind you to step outside of the box, follow your own rules and look at things in a different way.  You never know what you might use! 
Until next month my friends.
Be sure to check the Couture Creations Blog to be inspired 
by the amazing ladies on the Design Team. 
You can also follow Couture Creations on
FacebookPinterestInstagram and Twitter. 

Couture Creations Products Used

Have a crafty day! 
Tracey R
xx

Thursday, 17 December 2015

Christmas Bon Bon - Couture Creations

#couturecreationsaus

Hi there crafters! 
Thanks for joining us again today at Couture Creations. 

Can you believe that Christmas is only DAYS away??? 
I'm still wondering where the year has gone.  2015 has just flown by! 

So today I'm sharing with you a way to combine Christmas and craft - what a perfect combination! 
 I found these gorgeous gold glitter Bon Bons and immediately thought they'd make beautiful place name holders at our Christmas Day lunch.  By using a few Couture Creations products to add some extra touches, you too can make gorgeous decorations to your Christmas table. 

So Let's get crafting! 
I started with a plain gold Bon Bon.  I've used a pre made one, but you could certainly make the actual Bon Bon yourself (Pinterest is your friend here!!) 
I've die cut a tag from black card stock, and 2 Holly leaves from green 
cardstock.  Both colours are from the new Ultimate Crafts card stock.  It's such a nice card stock to work with, if you haven't used it yet, I highly recommend it! To make a mat for the tag I've simply traced around the edge of the die on the back of our very new and exciting red glitter paper.  Pop your die cuts to the side - We'll come back and assemble our tag at the end.
Couture Creations has only just released this gorgeous pack of 10 glitter papers - helloooooo sparkle!  So many pretty colours to choose from.  And all importantly the glitter stays ON the paper!!! How many times have you made a project with glitter paper and get more on yourself? 

Using the scalloped die from the Simone's Style (Amaryllis Ornamental Lace Die Collection), I've die cut lengths from the red glitter paper and attached with glue spots around the middle of the Bon Bon, and on each of the handles (you know the bits you pull!).  By using the Quick Release Die Paper you get a clean cut first time. And the little bits just fall right out of the die. 

On to assembling the name plate. 
Now if you know the names of your guests, I'd suggest adding them before assembling the tags -it's easier to write on a flat surface.  But you can certainly complete your Bon Bons prior, and then write names on the day if you wish.  
It's totally up to you. Take your black tag, add 12mm foam tape to the back and mount on the red glitter paper. Attached the Holly Leaves (Christmas Eve Collection, Christmas Labels) to the black tag with your Turbo Precision Glue Pen (perfect for fine details) in opposite corners. 
On each of the Holly Leaves I've added these gorgeous 3mm Pearls.  They are brand new from Couture Creations and in 12 beautiful colours, compliment our classic range of coloured pearls perfectly.  I adore our 3mm Gemstones, but I can see these new tiny pearls will quickly become a new favourite. 
Once you've assembled the name tags add some more 12mm foam tape to the back of the glitter paper and stick to the front of the Bon Bon. 
And you're done!
A relatively quick and easy way to add some home made touches to bought decorations.  Your guests &/or family will love the personalised touch. 


I hope that you and your families have a very happy & safe Christmas. 
And I hope Santa leaves some crafty presents under your tree!
(Suggest he shop for the new Couture Creations goodies!!!)


Thanks for dropping by. 

Be sure to check the Couture Creations Blog to be inspired 
by the amazing ladies on the Design Team. 
You can also follow Couture Creations on
FacebookPinterestInstagram and Twitter. 


Couture Creations Products Used


Monday, 12 October 2015

So Succulent with Couture Creations


#couturecreationsaus

Hi and welcome to Couture Creations today. 
Thanks for joining us. 

I just love weddings, especially love all the little details.
I was so excited to attend a gorgeous "pop up paddock" wedding earlier this year for
a wonderful couple.  There was a strong sense of vintage throughout the day,
but the hero and show stoppers of the day was the succulents. Hundreds of them!
The bride had lovingly potted and nurtured these little plants to decorate the ceremony and reception.
But the ones that stood out the most for me, were the ones on top of the cake
(Can i just say - that she made! She's a true amazing woman. Big shout out to you Rach!!)

Looking through the photos again, the deep purples and greens reminded me
of our beautiful Hearts Ease collection and was the inspiration for my layout today. 

So let's get crafting!


I started by selecting my papers from the Hearts Ease Collection
It matched so perfectly it was hard to narrow it down!

I decided on the purple diamond pattern, a two tone stripe and a green for contrast and to bring out those gorgeous greens in the succulents. 

I matted the main photo on several layers of the patterned Hearts Ease papers
and also added some vellum to break up the colours. 


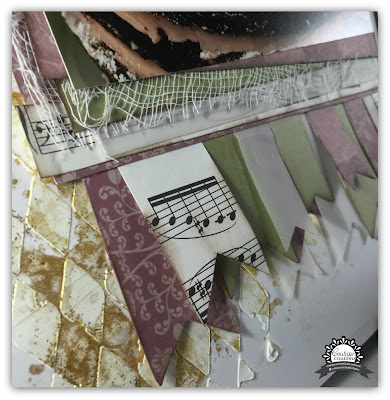
To create my background, I've stencilled modelling paste on to a piece of Core'dinations White cardstock, and dried with dried with the Couture Creations Heat tool.  Love this!
When it was all dry I've added gold spritz on top using some plastic packaging (waste not want not!). 


To add some extra sparkle to the layout and to finish off the background, I've applied Aztec Gold Glitzin' Glamour over the modelling paste and gold spritz. 


I've added added a strip of music paper behind both photos. and placed them on the layout 


I wanted to add another pop of green near the photo, so I added a small strip under the main mat.
To embellish the bottom of my page, I've made banners in various sizes from the same papers used matting my photoes.  

Under the smaller photo of the cake I've placed three of the new Couture Creations white flowers with Aztec Gold Glitzin' Glamour on top of some gauze. I used one full English Rose (3.5cm) on the left hand side, but as i wanted smaller flowers I've used the middle of the Camden Cottage Roses for this project (they rip apart easily) and will used the outer petals on another project.  
To add some dimension to the flowers, I used 3D Glue Spots to adhere them to the page. 


I've cut three of the new Tall Flourish die from the new Secret Garden Collection,
and placed one above the photo and 2 tucked under the flowers.
A die like this is when your Quick Release Paper really comes into its own!!
Cutting these fine lines is so easy and the cuts are so intricate and delicate.
I have to say it's becoming one of my favourites.

After adding the flowers and gauze to the lower left of the layout, I wanted more gauze and tucked in some around the main photo to add some interest and soften the lines.
Final touch was to add the title with letter stickers.


And we're done! 


Thanks for dropping by. 

Be sure to check the Couture Creations Blog to be inspired 
by the amazing ladies on the Design Team. 
You can also follow Couture Creations on

FacebookPinterestInstagram and Twitter. 


Couture Creations Products Used


\

Have a crafty day! 
Tracey R
xx


Thursday, 10 September 2015

Hope - with Couture Creations

#couturecreationsaus

Welcome welcome crafty friends!
Grab yourself a cuppa (or two) and come join me, Tracey R here at Couture Creations today. 

I'm excited to share this card with you - I made it for a special lady to let her know I've been thinking of her. And to remind her hope is with us, along with love and the support of good friends. 

So let's get crafting! 

I started with 1 Cottage Pollen Flower, 5 die cut Dandie Floral doilies (Perfectly Petite Doilies Range) and a 6x6 piece of the Hearts Ease Paper pad. 

I had the doilies left over from another project (waste not want not!) but they were green. 
So I've spritzed the doilies quite heavily with a bronze gold & the flower with a very light mist of a brighter gold. This gorgeous Cottage Pollen flower already had a gold centre so it matched perfectly. 

I chose this piece of 6x6 paper because the middle pattern matched the golds, and I liked the way the floral pattern bordered the paper.  I inked around the patterned paper  with brown ink, mounted it onto a piece of purple Core'dinations cardstock with 6mm Doubled sided tape and then attached that to a kraft background.  I've also inked around the edges of the kraft card. 

I laid the 5 doilies in a circular pattern and when I was happy with the arrangement, 
have used Craft Glue spots to attach them to each other.  
I've then secure the flower to the doilies with glue spots as well. 
If you want to add a sentiment, don't attach the flowers and doilies just yet. 
If you prefer to leave the card front sentiment free, go ahead and 
adhere the doilies to the card with glue spots. 

I wanted to heat emboss a stamped sentiment to tie in with the gold theme of the card.
I've added my sentiment in the lower left hand side, and then added 
my flower and doilies just above. 

I've added some purple and gold & white twine around the bottom of the card and 
tied a knot on the right hand side. 

I've added Wisteria 2mm gemstones to all the yellow flowers around the border. 

And just like that, we're done! 
I am finding that Kraft/Brown and Gold are my go to colours at the moment, 
and they complement the Hearts Ease collection beautifully. 


Thanks for letting me share some hope with you :) 


Be sure to check the Couture Creations Blog to be inspired 
by the amazing ladies on the Design Team. 
You can also follow Couture Creations on
FacebookPinterestInstagram and Twitter. 


Couture Creations Products Used